New approach to the results of internal inspection
The most efficient way to ensure the integrity of aging pipelines is a sequence consisting of internal inspection, elimination of major defects, and subsequent pressure testing. This has been proven on a crude oil pipeline DN 700 that was shut down, emptied, chemically cleaned and conserved by nitrogen as the crude oil transport through this pipeline was no more needed.
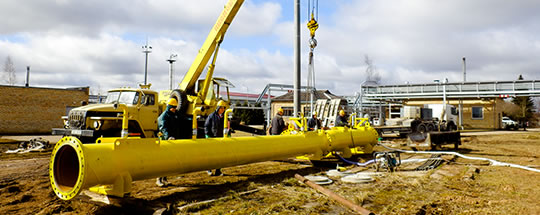
Installation of the temporary traps
The pipeline owner then considered the option of commission of this 45-year-old oil pipeline after long shut-down period for transportation of another media. A revalidation of a section of this pipeline was therefore carried out. As part of the revalidation a targeted combination of off-line internal inspection and subsequent integrity test was used. This enabled the operator to use a fundamentally different approach to the results of the internal inspection.
Possible solutions when existing pipeline exceeds the expected lifetime
It is generally known that parts of high pressure pipelines in many countries are approaching or have exceeded their expected lifetime. Their operators have different approach towards solving these problems, for example:
- Construction of new pipelines – the most financially demanding and often unnecessary,
- Internal inspection of “inspectable” pipeline and repairs of dangerous defects – however not all pipeline defects are detectable by internal inspection today,
- Preventive repairs of risk pipeline sections on an “uninspectable” pipeline,
- Revalidation of old existing pipelines – comprehensive pipeline integrity verification based on the integrity test.
CEPS specialists have more than 25 years of experience with the following work:
- Revalidation of old existing pipelines where material fatigue and serious defects can occur,
- Integrity tests of pipelines with defects,
- Upgrading of pipelines – increasing of MAOP and/or increasing safety requirements (civil construction in proximity),
- Re-commissioning of pipelines after long shut-down period,
- Combination of the above methods.
During the above mentioned period, CEPS has carried out revalidation, upgrading and re-commissioning of more than 1 000 km of 4 to 28 in high pressure steel pipelines in Europe.
Revalidation as a combination of currently commercially available methods
In 2011, CEPS accomplished emptying, chemical cleaning and conservation of a DN 700 crude oil pipeline after its shut-down. In 2013, CEPS was awarded the general contract to verify the possibility of revalidation of this high pressure pipeline for the purpose of its future use. The customer chose about 8 km long section for this. The performed revalidation included the following basic steps:
- The material tests of pipe samples,
- The model integrity test on a test vessel from a spool taken from the pipeline,
- Off-line internal inspection using TFI tool,
- Analysis of the internal inspection results,
- Necessary repairs and preparation of the pipeline for testing,
- Integrity test, drying and nitrogen purging.
Material tests
Tests of material properties were performed on the samples taken from the tested section. These basic material properties were determined:
- The elasticity limit (yield point) Re, the ultimate strength Rm and elongation A,
- Chemical analysis,
- Fracture mechanic properties – notch and fracture toughness.
Based on the test results, the steel quality was evaluated to be standard, without any major defects.
Integrity test – experimental model
The integrity test is a specially modified stresstest where controlled hydrostatic overloading of pipeline up to yield point is monitored by a very precise measurement system. This test proves the real level of integral elasticity limit of the pipeline and verifies the real safety factor.
Pressure overloading blocks the fatigue growth of under-critical cracks existing in the pipeline wall for many years of future operation and therefore extend its operational lifetime. The cracks of the over-critical size burst safely during the test and are cut out and repaired.
Integrity test of pipeline material was modelled on a test vessel manufactured from a pipe taken from the pipeline section (see figure 1). The parameters of the test were specified based on the results of material tests.
During the integrity test the following measurements and monitoring were carried out and recorded continuously:
- Measuring of test pressure dependence on added water volume,
- Monitoring of the crack growth using the acoustic emission,
- Measuring of local deformations and microdefects.
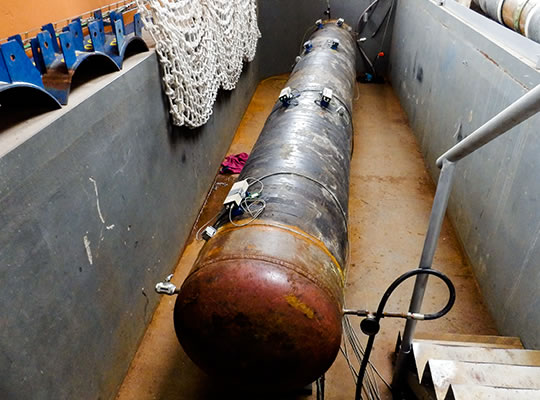
Figure 1 – Pipe test vessel
Completed material tests proved the high quality of steel material of the oil pipeline section. After more than forty-year period of operation there were no signs of degradation of pipe material. Acoustic emission showed that a reduction of internal stresses in the pipe material and a stabilization of defects occurred during the test.
Based on the results of all the tests, the maximum allowed test pressure and the maximum allowed value of plastic circumferential deformation for on-site integrity test of the pipeline were determined.
Cyclic fatigue test – experimental model
The test of resistance to cyclic fatigue and the crack growth caused by the fatigue mechanism was performed by high cycle loading (see figure 2) on the same test vessel as the integrity test.
The fatigue test was performed under these conditions:
- Pressure amplitudes were from 5 bar to MAOP,
- 15 000 of cycles simulated 30 years of the future pipeline life.
During the fatigue test, no development of dangerous defects was detected by acoustic emission. Simulation of the long-term operation by cyclic pressure loading verified the considerable life-time extension which was achieved by the integrity test.
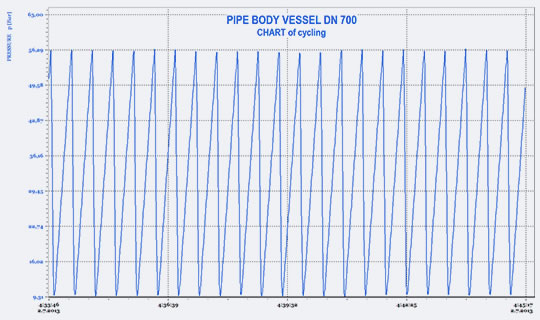
Figure 2 – Cyclic fatigue test – part of p–t chart
Destruction of the test vessel
The test vessel was pressured up to the ultimate strength limit Rm of the pipe material. When pressure achieved the value of in advance calculated pressure of ultimate strength, the destruction of the longitudinal weld occurred (see figure 3).
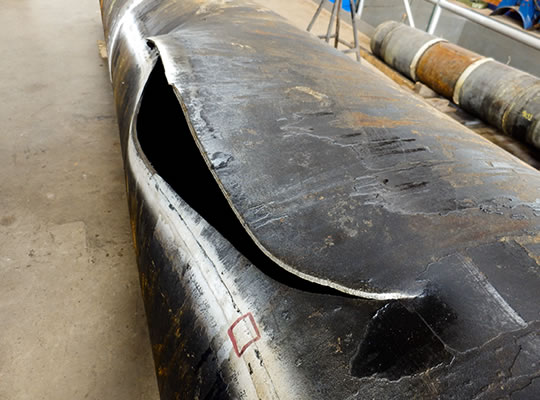
Figure 3 – Destruction of the test vessel
Internal inspection of the pipeline section
As it is well known, on pipelines of that age there are almost always manufacturing defects, then defects caused during construction of the pipeline (welding, laying), defects initiated by the service load, corrosion defects and defects caused by third parties. For this reason, the pipeline operator required an internal inspection of a short pipeline section, whose main objective was to detect and locate defects that would certainly not withstand the test pressure during the subsequent integrity test.
In 2000 the MFL and UT internal inspection of the pipeline was carried out. After subsequent shut down of the pipeline it was not expected further development of fatigue defects (particularly the creation and growth of cracks caused by changing pressures in the oil pipeline). Based on this fact the pipeline operator decided to carry out the internal inspection using TFI tool before the integrity test.
The section was not equipped with launching and receiving traps and therefore CEPS designed a manufactured the temporary traps for the inspection tool run (see figure 4).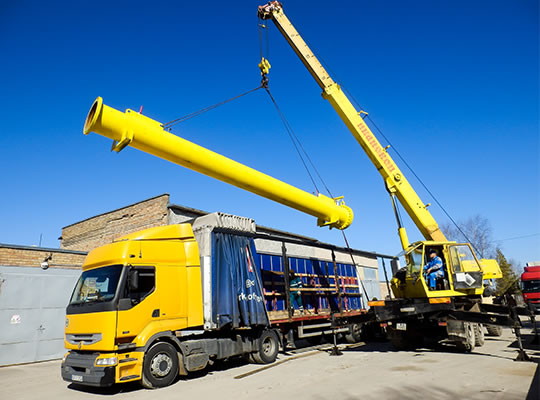
Figure 4 – Installation of the temporary traps
The pipeline remained empty after chemical cleaning and subsequent preservation and it was necessary to ensure a steady movement of the inspection tool by a substitute medium. CEPS propelled the TFI tool through the pipeline by water in this case.
Propelling of the inspection tool through the pipeline section
In accordance with the requirements of the TFI provider, the inspection tool had to be driven through the pipeline with a speed at least 0.5 m/s. It meant pumping of 685 m³/h of water into the pipeline during the run. In total we pumped in about 3 100 m³ of water during 4.5 hours. For illustration – this amount of water would be enough for the supply of all fountains in the gardens of Versailles for one hour.
To ensure the supply of this huge amount of water CEPS built 4 water lines to connect mobile pumps with the end of the inspected pipeline section (see figure 5).
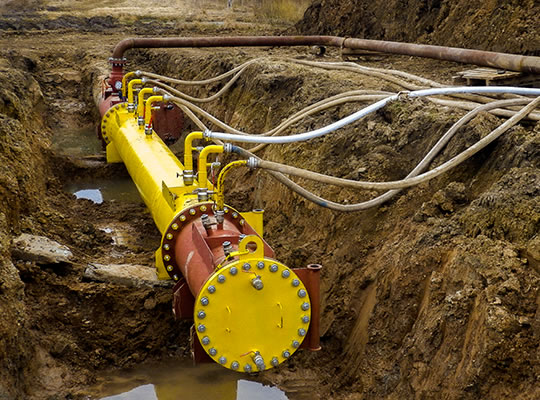
Figure 5 – Launching trap with the water supply pipeline and hoses
After removing of the inspection tool from the receiving trap, the check of measured data was done. This confirmed that the TFI tool was already at its first run propelled through the pipeline section at the required velocity (see figure 6) and the measured data were good for their further processing.
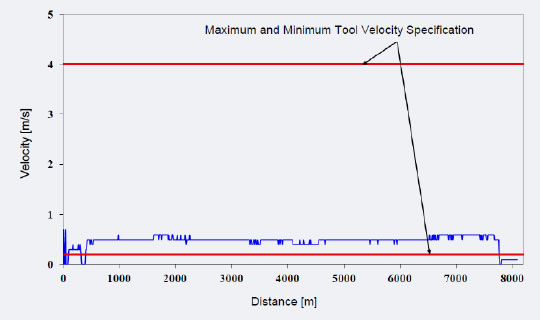
Figure 6 – Tool velocity chart
Assessment of inspection findings
The TFI provider evaluated the detected defects using the industry standard ASME B31G, RSTRENG, API 579 (level 2) and DNV Code and recommended to repair 162 defects.
Reassessment of defects – a new approach
CEPS divided defects revealed by the internal inspection into two basic groups:
- Large defects (overcritical), that would surely cause a rupture of pipeline wall in the process of integrity test. These defects were cut-out and replaced by a new spool prior to the integrity test,
- Smaller defects (subcritical), that had been evaluated by TFI as unacceptable and destined to be repaired, but during the integrity test were stabilized, so that their repair was not needed.
This enabled a fundamentally different approach to the results of the internal inspection which significantly reduces the required number of pipe repairs after internal inspection and provides higher pipeline reliability because during the integrity test also other defects that were not within the inspection recommended for repair or were even not detected at all are stabilized.
In the reassessment of detected defects that were evaluated by TFI provider by standard way, CEPS chose the following approach:
- Dents, laminations and certain weld defects were not repaired – the strength of pipeline in these spots should be checked during the integrity test,
- Material loss defects were recalculated according to ANSI/ASMEB31.G modified and RSTRENG, DNV Code.
Defect assessment by provider vs reassessment determined by CEPS
| Defects description | Defects recommended to repair by TFI provider | Defects repaired based on CEPS reassessment |
|---|---|---|
| Dents with an another types of defect | 9 | — |
| Dents located in/near a weld | 9 | — |
| Metal loss (internal and external) | 16 | 6 |
| Anomaly of a circumferential weld | 85 | 1 |
| Anomaly of a longitudinal/spiral weld | 26 | — |
| Inadmissible design elements and illegal hot taps | 17 | 12 |
| Total | 162 | 19 |
Integrity test of the pipeline section
The special pressure test method was designed for the test of integrity of the pipeline section after the internal inspection. CEPS used such a modified pressure tests for steel pipelines after a long period of operation. This integrity test is a modified stresstest that evaluates the real integral yield strength of the pipeline section, and therefore its real safety against the operating pressure. The principle of this test is overloading of the tested pipeline section by high pressure water up to integral elasticity limit in the pipeline wall (calculated in advance) respective to stress approaching the elasticity limit.
The result of the integrity test, except verification of current technical condition of the pipeline, is improving conditions for its future safe and reliable operation by removing a large and critical defects and the long-term blocking (stabilization) of the further development of subcritical defects caused by fatigue processes.
Destruction during the integrity test
One destruction of the testing section occurred during the integrity test. In the course of destruction the pressure in the pipeline decreased to 0 bar during 1 second. It represents a water leakage of about 10 m³. The damaged part of the pipe was cut out and investigated. A longitudinal crack in the middle of the longitudinal weld on the external pipe wall caused the destruction.
We found that the pipeline bitumen coating penetrated on the fracture surface up to the depth of 7 mm while the total thickness of the longitudinal weld was about 11 mm (see figure 7). This area at the outer surface with incoherently black coating was about 150 mm long, but the total length of crack reached a length of up to 250 mm.
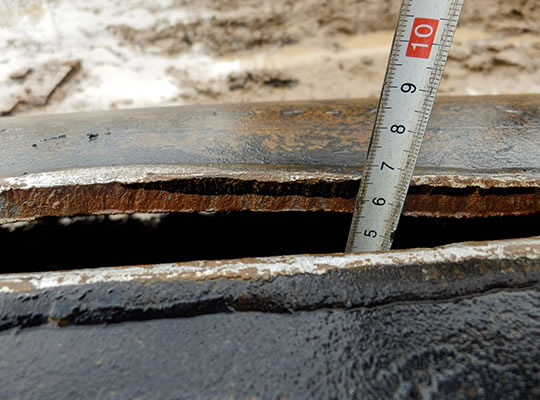
Figure 7 – The pipeline bitumen coating penetrated on the fracture surface up to the depth of 7 mm
The investigation revealed that the coating was a usually used bitumen insulating primer. The primer had to penetrate into the crack at a hot temperature during a coating process. It clearly showed that this longitudinal crack created already in the process of production and has existed in the pipeline for more than 40 years. During the whole period it remained hidden to all available internal inspection methods used in the last 13 years.
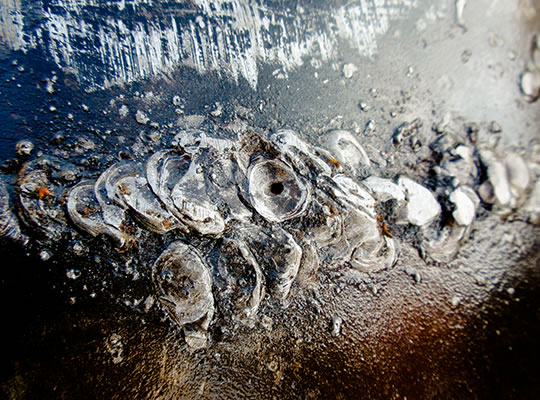
Figures 8 – Undetected defect
CEPS experience
CEPS has performed integrity tests together with internal inspections using MFL and TFI tools on more than 250 km of high pressure pipelines in Europa during last 10 years. In these tests more than 20 pass-through defects already in the time of an internal inspection or defects that caused a pipeline destruction during hydraulic tests were detected. These critical defects were not only recommended for repair, but quite often they were not detected by the intelligent tool (for example, see figure 8 and figure 9).
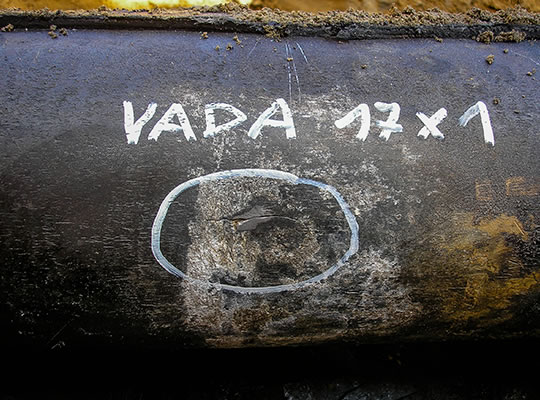
Figures 9 – Undetected defect
